Hip and Valley Roof
Hip and valley roof is simply modified hip roofs. The shape and pitch of the surfaces are basically the same, however the base shape changes from a simple rectangle to a ‘T’ or ‘L’ shape, on plan.
People choose different options to see the roof of their house and roof hips and valleys are one of them. It gives the house a beautiful look and is mainly preferred by people living in cold climatic conditions where there is snowfall and strong winds. Valley Roofing and Exteriors is a premier roofing contractor in Virginia.
Hip and valley roofs have multiple valleys that help lead rainwater flow into gutters and downspouts. They also increase the lifespan of a roof due to the improved gutter system.
Also Read:Free Window Replacement Program
Hip roofs are typically more stable than gable roofs because they consist of four slopes rather than two. They are a better choice for areas that experience high wind.
In this article, you will get to know all about the Hip and valley roof, how to frame a valley roof, How are Hip and valley rafters are attached, and the various advantages and disadvantages of the Hip and valley roofs.
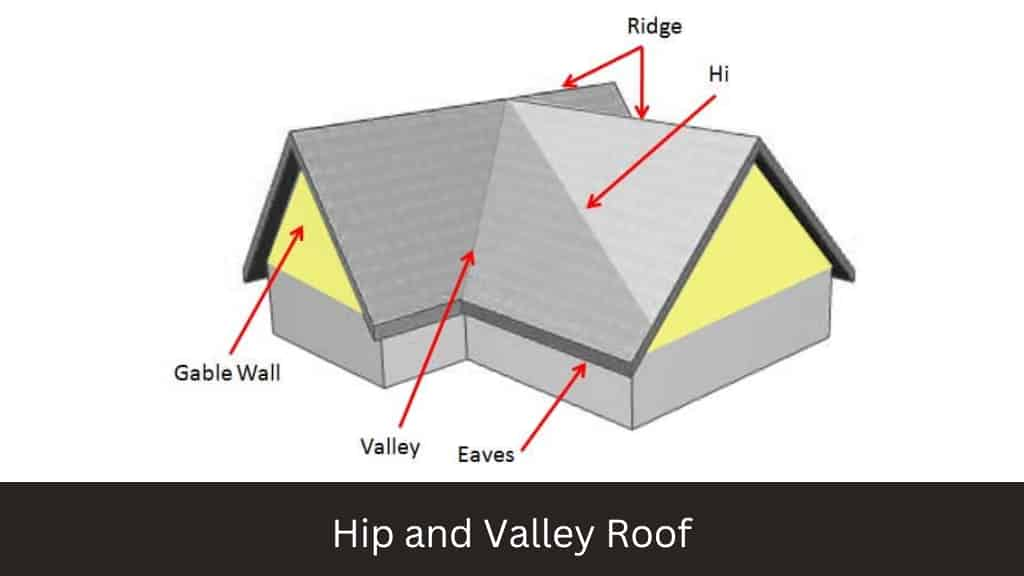
What Is the Hip of a Roof?
Hip Roof Definition: The hip roof, also called a hipped roof, is a roof that slopes upward from all sides of a structure, having no vertical ends. The hip is the external angle at which adjacent sloping sides of a roof meet.
What is a Valley on a Roof?
A roof valley is formed where two roof slopes meet. Water collects in a valley to flow off the roof. Your choice of valley installation method is critical because, when improperly installed, valleys are risks for serious leaks. Essentially, there are three main ways to shingle a roof valleyHip and Valley Roof: woven, closed-cut and open.
What Is a Hip and Valley Roof?

Hip and Valley roofs are a type of roof that is in the shape of a pyramid, and the primary function of this roof is wind resistance. These roofs are mainly chosen by the people living in the area which has heavy rainfall occurs or the areas where snowfall occurs.
Hip & valley roof functions are to clear rainwater or snow quickly from the top of the house because on a flat surface, it is hard to clean snow, and due to heavy rainfall, the chances of leakage in the roof will be high.
In roof hip valley roof designing, more pyramids are combined together, and it’s a different look to the house given by the architect. The stability of these types of roofs is also good and long. The roof is slant, so it is very easy for snow or rainwater will fall off easily.
Also Read: Lean To Roof Ideas | Sawtooth Roof | Hip and Valley Roof | Catslide Roof
Hip and Valley Roof Design
Before you can understand the roof of the hip and the valley, you need to know what the hip roof is.
In its most basic form, the hip ceiling is an OP -splashing roof all around. In square homes, the sides are found at the peak, while in rectangular homes, the hips come together to form a ridge. Hip roofs are popular because they can withstand intense wind.
The roof of a hip and valley is made of two or more ceilings that are found in the middle. Hip and valley roofs can be used on more than one layer, exotic shapes, dormers, or homes with additions to homes with already hip roofs.
The Recommended Minimum Angle for a Hip and Valley Roof Is:
- 12 degrees for asphalt shingles
- 7 degrees for aluminum tiles
- 14 degrees for concrete tiles
- 16-18 degrees for ceramic tiles
Hip and Valley Roof Examples
Here are a few hip and valley roof examples.
Large House with a Hip and Valley Roof

A hip and valley roof is a type of roof design that includes both hip sections and valley sections. A large house with a hip and valley roof gives a stunning architectural look. The hip and valley roof design gives the house a unique and attractive look. The roof slopes downwards on all sides. It’s top forms a pyramid-like shape. there
Intricate Hip Roof on Two-Story Home

An intricate hip roof incorporates multiple hip sections with different pitches, angles, and levels. Which creates an intricate and visually captivating ceiling. This type of roof requires skilled craftsmanship to architecturally house the house.
Intricate hip roofs can be used over asphalt shingles, cedar shakes, or metal roofing as two-story home materials to create a sophisticated and elegant aesthetic.
Split Level Ranch with Hip and Valley Roof
Hip and valley roofs are ideal for multi-level homes, such as split-level ranches. The split-level ranch includes four hip roof sections. which consists of two large areas covering the main structure, and two smaller areas covering the porch and a small portion of the house.
Hip and Valley Roof Framing

In hip and valley roofs, there are four sides that meet at the top and have a downward slope. Any roof structure with a downward slope and meeting at a point in the upward direction is known as Hip and valley roof.
Some steps have to be followed in building a hip and valley roof.
- Measurement and cutting of rafters
- Assembling of the king and hip rafters
- Finishing of the hip and valley roofs
Also Read: Chimney Flashing | Roof Flashing | Counter Flashing | Gutter Guard | Gutter Helmet Vs Leaf Guard
Let’s discuss in detail about these steps of the Hip and valley roof framing:
1. Measurement and Cutting of Rafters:
- First of all, measurement of the building has to be done. The width and height of the walls should be measured so that the upper roof area will be made according to that. Tools are used in calculating the walls like measuring tape, and if it’s a small area, then you will also make it by analyzing the average area required to be covered.
- The length of the common rafter should be measured, and roof pitch has to be measured to make the short ends of the roof.
- Then the location of cuts will be marked on the rafter, which has to be cut.
- After locating cut marks, the birdsmouth location also marked birdsmouth is a gap craved in the rafter so that it can be fixed on the top of the wall of the building.
- Now using a round saw, considerable length has to be cut, and also birdsmouth is also cut down.
Related Read:
2. Assembling of the King and Hip Rafters:
- Six to seven rafters are attached in equal gaps to the centre, which helps to uplift the beam.
- These rafters are nailed to the ridge beam, making it more solid and safe.
- Six king common rafters are attached to the ridge board’s end.
- The hip rafters are fixed to the ridge beam by using nails, and also corners are fixed by nails to the walls.
- The rest common rafters are adequately nailed to the ridge beam.
3. Finishing of the Hip and Valley Roof
- The jack rafters are nailed to the hip rafters to secure them to the walls of the building.
- Plywood sheets are to be determined because they will be used in the making of the roof, so it is necessary to arrange the required number of sheets of plywood.
- Then plywood sheets are nailed to the rafters.
- Asphalt shingles are attached to the roof, and another material has to be attached to the roof.
This is the whole process of building hip and valley roofs in detail.
Also Read : Conservatory Roof | Gable Roof | Bonnet Roof | Saltbox Roof | Gambrel Roof | Types of Curved Roof
How Are Hip and Valley Rafters Attached?
- The first step in the attachment of hip and valley rafters is hip roof is erected to get the ridge beam and four to six common rafters are positioned at an equal distance to give the centre position and then by using nail gun nail the rafters firmly to the two longest walls of the building and then the ridge beam is lifted to the required height.
- The next step is attaching six to eight common rafters to the roof and nailing them to the walls so that they will work as strong support to the roof. Using the nail gun you have to nail these rafters to the beam from the top of common rafters.
- There are more rafters that have to be attached from the sides of the walls these common rafters give tight hold to the roof. The ridge board is attached to the rafters by using nails and the structure will be ready.
- It is necessary to give a hold to the corners too so that rafters are nailed from the ends of the corner to give extra support to the roof.
- The rest work which is left or the thing which is left to attach is done by using nails, this is the last step of the process in which the structure is nailed properly so that no area will be left weak.
Also Read : Clerestory Roof | Composition Roofing | TPO Roofing | Butterfly Roof
Hip and Valley Roof Advantages and Disadvantages

Here we discuss hip and valley roof pros and cons
Advantages of Hip and Valley Roof
There are various Hip and valley roofs pros are as follows
- In the hip and valley roofs, the gutter system plays an important role and works perfectly in this type of roof. It is very easy to maintain a gutter system in the hip and valley roof because it is easy to clean and maintain and at the time of replacement it will be easily replaced without any issue.
- It gives a traditional look to the house and looks It is preferred by people to give an atheistic look to the house. It looks beautiful that is why people demand it.
- It gives a strong top to handle high wind.
- The hip and valley roofs have a slant so that rainwater and snow will fall down easily from the top of the roof.
- In the hip and valley roofs system, there is a spacious area left in the home and the house looks bigger from the inside.
- It is easy to maintain.
- Good choice for people who are living in cold climatic conditions.
Hip and Valley Roof Disadvantages
There are also some of hip and valley roof cons as follows
- In the hip and valley roof systems, the chances of leakage will be high.
- It needs regular maintenance.
- The hip and valley roofs are expensive to construct and highly skilled labor is required to make it.
- It will take a long time to build hip and valley roofs.
- It will work in cold climatic conditions or the place where snowfall occurs.
Conclusion
So this is the detailed study about hip and valley roof in which every part is elaborated to give you whole information about hip and valley roofs in easy language that will help you to understand it in a better way and you can choose the best for you.
Hip and valley roof has high densities which will ultimately help to prevent the windstorms from lifting it off the property. Due to the increased density, the cost is also getting increased.
Any contractor will advise homeowners to construct additional roofing joists which help your property to handle the weight of the durable roof.
Additionally, your property aesthetics improve with roofing valley and hips designs. While it showcases the natural beauty of your roofing materials, the design requires more roofing materials to complete its construction.
Like this post? Share it with your friends!
Suggested Read –
- What Is a Sawtooth Roof? | How to Build a Sawtooth Roof? | Advantages &Disadvantages of Sawtooth Roofs
- What Is a Movable Wall? | Types of Movable Walls | Modular Walls for Offices | Advantages of Movable Wall Systems
- What Is Roof Eaves? | Different Types of Eaves Styles | Roof Eaves Repair Cost
- What Is Slurry Wall Construction? | Slurry Wall Construction Process
- What Is Metal Roof Insulation? | Metal Roof Insulation Options
Frequently Asked Questions (FAQ)
How Do You Make a Gable and Valley Roof?
Hips and Valleys Roof
Hip roofs have four slanted sides. A valley in a roof is the point at which two roof surfaces meet. The valley in a hip and valley roof is where many hip roofs meet.
Hip and Valley roofs are a type of roof that is in the shape of a pyramid, and the primary function of this roof is wind resistance. These roofs are mainly chosen by the people living in the area which has heavy rainfall occurs or the areas where snowfall occurs.
What Is the Hip and Valley Plan of a Roof?
In the hip and valley roofs plan, the main hips intersect with the common rafters of the gables on one side and the rafters of the valley on the other.
Roof Design Hip
These roofs are the most common type of hip roof design, with a ridge over a portion of the roof which in turn creates two polygon sides and two triangles.
Hip and Valley Roof Calculator
For the roof hip and valley slope indicated as “X-in-12” (Rise-in-Run), the square root of ((rise / run) ² + 2) is determined by hip valley calculator the slope adjacent to the hip and valley factor. Roof sections are divided by rise by the run.
Roof valley angle calculator: The Valley roof option is used to calculate valleys for 90 degree intersecting roofs with equal slopes and wall plates at the same height.
Hip Roof Designs for Houses
Hip roofs are popular with bungalow-style houses. Hip roofs are also commonly seen on the architectural style called American foursquare. Here is an example of a hip roof and a hip dormer. One of the disadvantages of a hip roof is that having all four sides slope inward loses valuable attic space.
Roofing Valleys and Hips
In hip and valley roofs, there are four sides that meet at the top and have a downward slope. Any roof structure with a downward slope and meeting at a point in the upward direction is known as Hip and valley roof.
The following steps must be followed to create a roof valley framing.
- Measurement and cutting of rafters
- Assembling of the king and hip rafters
- Finishing of the hip and valleys roof
Hip and Valley Roof House
In the hip valley roof house design, more pyramids are combined together, and the hip roof design pictures a different look to the house given by the architect. The stability of these types of roofs is also good and long. The roof is slant, so it is very easy for snow or rainwater will fall off easily.
Hip Roof Style
A hip roof is a roofing style with four downward sloping sides to the walls. All the sides slant downwards at a consistent angle, meeting at a ridge in the center of the roof. hip roof house plans are usually rectangular, and you won’t find any vertical sides or gable ends.
Valleys in Roofing
Define a Valley: valley on a roof is formed where two roof slopes meet. Water collects in a valley to flow off the roof. Your choice of valley installation method is critical because, when improperly framing valley roof are at risk of serious leaks. Essentially, there are three main ways to shingle a roof valley: woven, closed-cut, and open.
What Is the Difference Between a Hip Roof and a Valley Roof?
Hip and valley roof rafters are load-bearing roof members that run at an angle – (usually 45 degrees) up to the support walls and even on the pitch. The main difference between the two is that there is a hip at the top of the rafters hanging in the hip roof, and a valley below the rafters hanging in the valley roof.
Hip Roof with Valley
A hip bevel describes the angle formed by two sloping sides of a hipped roof. A roof that has hips and valleys has more than one section where four sloping sides meet, but these sections are joined to other hipped roof areas.